
Today I will be showing you how to draft a basic skirt pattern – a “sloper” or “basic” – from which you can design any skirt you wish. The sloper is a basic pattern without any wearing ease or design ease, made exactly to your measurements. It is really an easy process; I think it is easier than making adjustments to a commercial pattern so that it fits you properly!
Measuring
Measurements are taken while wearing your usual undergarments, barefoot, on a solid surface floor.

First, tie some string, shoe string, yarn, or thin elastic around your waist. Bend side to side until it settles into your naturally slimmest spot. For the purposes of making your sloper, this is your “waist” line. Don’t worry if it is a lot higher than you normally wear your skirts – when you design the actual skirt you plan to wear, you can draw in a new, lower waistband for your skirt.
You will need a flexible dressmaker’s tape measure, or a piece of string and a ruler, yardstick, or carpenter’s tape measure to measure the string.
Measure the circumference of your waist at the “waist” string, and the circumference of your hips at the point you are biggest around. Also measure exactly how far below the waist string this biggest point is.
Then, measure from the waist string to the finished length you desire your skirt to be. If you have no exact length in mind at this point, measuring to the knee is a good starting point. You can always design your actual skirt to be longer or shorter, as desired.
Before you untie the waist string, you’ll take a few more measurements. But first, a brief explanation.

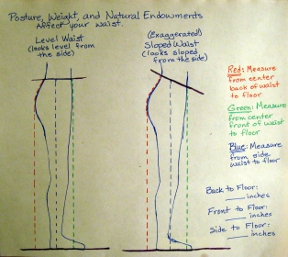
Have you ever noticed someone wearing a skirt that is unintentionally shorter in back than in front?
That is because some of us have level waists, and some of us have sloping waists, when seen from the side. Posture, weight, and natural endowments (those with larger “booties” or “bellies”) affect how clothes hang from the waist. And, some clothing, such as jeans, is often designed to ride higher in back than in front.

To fix the uneven hem problem, some folks just add extra length at the back hem of the skirt, and call it good. However, in that case, the skirt is still not hanging right. The side seam sweeps towards the back instead of running straight up and down.
The place that needs extra fabric is at the top of the skirt – to go over the booty. Or, in the case of the front, perhaps the skirt waistband tends to droop lower in front to fit below the belly, in which case we may need less fabric at the top in the front.

We will design our skirt sloper so that it fits properly and the side seams will end up straight.

Measure from the center back of your waist string to the floor. Rubber-banding the end of the tape measure to a can of food might help you take this measurement if you do not have someone to help you. Measure also from the center front of your waist string to the floor, and from the side of the waist string to the floor. The side measurement should be between the other two measurements.
Drafting the Sloper
Now we are ready to draft your “sloper!”
You’ll need a large piece of paper. Gridded or dotted “pattern paper” which is really more like vellum or interfacing, depending on which type you get, is really nice – but I’ll let you in on a secret. The back side of gift wrap, especially the kind with a light grid marked to make it easier to cut a straight line, works just as well!
A yardstick or ruler, pen and pencil, and something with a square corner on it will complete the tools needed. A dressmaker’s or carpenter’s square will double as the ruler and the square corner.
Before you get started, do a little bit of simple math. Divide your waist measurement by four, and write that number down. Also divide your hip measurement by four, and write that number down.
Use pencil until step five. Take a deep breath, clear off the dining table, and here we go!
Step One:

Draw a line down the left side of your paper, very close to the edge. Start an inch or two from the top edge of the paper. Make the line a little longer than the “length” measurement you took earlier (i.e., waist to knees). This line represents the center front or center back line of your sloper.
About an inch or two from the top of the paper, draw a perpendicular line across the paper. The length of this line is your 1/4 waist measurement.
Measure down the paper the distance that your widest point of your hips was below your waist. Make a mark. Draw a perpendicular line across the paper at this point. The length of this line is your 1/4 hip measurement.
Measure down the paper till you reach the measurement from your waist to the skirt length, and make another mark. Draw a perpendicular line across the paper at this point. The length of this line is also your 1/4 hip measurement.
Did you discover during the measuring process that you had a sloping waist? Compare those lengths now. You might have numbers such as 41 inches and 45 inches. Subtract the smaller one (usually the front) from the larger one (usually the back). In this example, the result is 4 inches. Divide that number by 2. For my example, that is 2 inches. The example’s sloping waist adjustment is 2 inches.
Go back to your paper, and make a mark two inches above the top line, and two inches below the top line – or whatever your number happens to be. We won’t do anything else with this mark for now. (If you didn’t leave enough room at the top of your paper for the top mark, don’t worry. We’re doing the front sloper first, which usually is the lower mark, and you can start drawing further down the page when we do the back sloper. We only need the lower mark right now.)
Step Two:
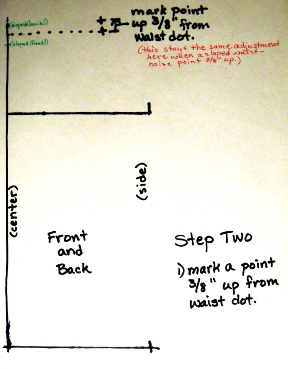
Measure up 3/8 inch from the end of the top line, and make a mark. I will sometimes refer to this as the “waist dot” in the rest of these instructions.
Step Three:

Connect the dots…the intersection of the waist line with the vertical line, the waist dot you marked in Step Two, the end of the hip line, then straight down to the end of the hem line.
Find the mid-point of the line you just drew at the waist. An easy way to do this is to pinch off that length of paper, and fold it in half. Mark the center of the line on your just-drawn waist line. This will become the center of a dart.
Measure from the center line to the dart mark you just made. Then, measure from the center line along the hip line that same distance, and make a mark. Connect these two marks with a vertical line. This represents the fold line of a provisional dart. You will adjust this later in the fitting process – but this point is “close” to where most people need a dart.
Going back to the sloping upper line we recently drew, make a mark 3/8 inch to the left of the dart line, and 3/8 inch to the right of this line. Then, draw from these new points to the base of the dart line at the hip line.
If you are making a sloped waist adjustment, draw from the mark you’d made on the center line, to the far end of the waist line.
See the illustration if you have any questions. This completes the Draft version of the Front Sloper.
Step Four:
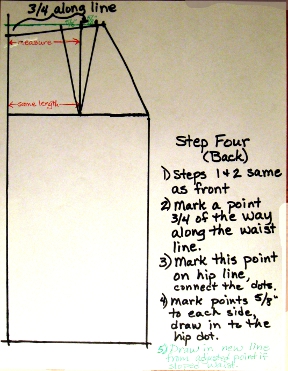
Repeat Steps One and Two, making sure to start your line further down the page if you need to leave room for a sloping waist adjustment.
Connect the dots…the intersection of the waist line with the vertical line, the waist dot you marked in Step Two, the end of the hip line, then straight down to the end of the hem line.
Mark a point 3/4 of the way along the top line you just drew. You can use the paper trick here again. Fold the paper in half then in half again. Mark a point that far from the right side of the line (towards the waist dot, rather than in the middle). The back dart is further towards the side seam than the front dart.
Measure from the center line to the dart mark you just made. Then, measure from the center line along the hip line that same distance, and make a mark. Connect these two marks with a vertical line. This represents the fold line of a dart. Again, you will adjust this later – but this point is “close” to where most people need a dart.
As before, make marks to the right and left of the top of the vertical line you just drew, but in this case, the marks are 5/8 inch away. Then draw the “legs” of the provisional dart to the bottom point on the hip line, as before.
If you are making a sloped waist adjustment, draw from the mark you’d made on the center line, to the far end of the waist line.
See the illustration if you have any questions. This completes the Draft version of the Back Sloper.
Step Five:
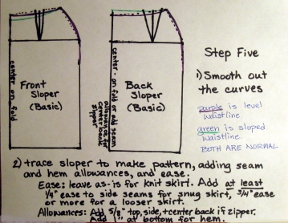
Smooth out the curves. Sketch them out by hand in pencil, or use any handy objects (plate, platter, French curve ruler, hip curve ruler) for a more even line. On the illustration, the dotted lines are the original “straight lines” and the evened-out curved lines are in purple. I have marked where the “sloped waist adjustment” lines would be, in green, so that you have an idea of what your sloper will probably look like.
Carefully go over the following lines in pen or marker:
- Center front
- Your new waist curve
- Your new side curve
- The bottom line
- The center and both legs of the dart
Your Draft sloper is now finished!
Using Your Sloper
Before we use your sloper to make a pattern to sew a skirt from, wearing ease and design ease will need to be added, and seam allowances.
Carefully cut out your sloper, and trace it onto another piece of paper. Carefully fold and store your draft sloper. Make the following adjustments onto your new tracing:
Ease:
For a knit skirt, made out of stretchy fabric, you do not need to add any wearing ease. For a skirt to be made out of a woven fabric, add at least 1/4 inch ease to the side seams for a snug skirt, and 3/4 inch ease or more for a looser skirt.
Allowances:
Add 5/8 inch to the top and side for a seam allowance. Add 1 inch to the bottom as a hem allowance. If you are sewing a woven fabric, add a 5/8 inch seam allowance to the center back seam so that you can put in a zipper.
EXCEPTION: When you are sewing a sample garment out of inexpensive fabric to test the fit of your new pattern, add 1 inch seam allowances all around, just in case. This will give you adjustment room if you should happen to need it.
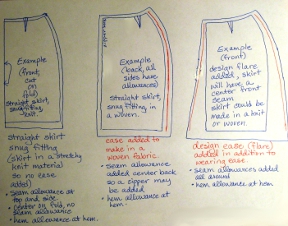
Here, I have illustrated adding ease and seam and hem allowances. One of the drawings gives an example of how extra ease might be added to create more width at the bottom of the skirt. (Please note this is a conceptual illustration only – the actual way you should do this is a bit different, and results in a better-looking skirt than this “pattern” would make!)
In later lessons, we will cover checking the fit of your new pattern by making a sample garment (called a “muslin” because it is often made out of muslin or gingham fabric). Once you are happy with your sloper, glue or trace it onto posterboard, and carefully cut it out. Now it will be easy to trace to make all your new designs!
If you are intrigued by the process of drafting your own patterns and would like to know more, or if you get stuck and need some assistance, I would be glad to schedule some one on one time with you. Contact me through the Facebook page (The School of Lost Arts) or by email.
One book that I can highly recommend on the process of pattern making is a recently updated classic by Don McCunn, called How to Make Sewing Patterns. The original version of this book was the textbook in my college class on pattern making, and it is easy to understand and use. My method of drafting a skirt sloper is a modified version of the method I learned in that class.
The revised book is here, and the reviews of the original version are here. (As of this post, the revised version is too new to have any reviews!)
Useful tools and equipment if you decide to really get into drafting and designing your own patterns:
(Please note that these are affiliate links, and I earn a small commission for purchases made from these links which helps offset the cost of this site.)
More sewing classes.
More crafts.
